
Uncategorized
Categories
React 18 and Concurrent Mode


Categories
Strapi Vs WordPress

Pros and Cons of WordPress and Strapi
Both WordPress and Strapi are popular content management systems (CMS), each with its own pros and cons. Let’s take a look at some of the pros and cons of each:
Pros of WordPress

- Easy to use: One of the biggest advantages of WordPress is its ease of use. Even if you’re not a technical person, you should be able to create a basic website or blog with WordPress.
- Wide range of features: WordPress comes with a wide range of features out of the box, including a built-in blog, media management, and support for third-party plugins and themes. This makes it a good choice for small- to medium-sized projects that don’t require a lot of customisation.
- Good for SEO: WordPress is designed with SEO in mind, which helps to ensure that your site is visible to search engines. Additionally, there are a number of plugins and resources available to help you optimise your site for SEO.
- Community support: WordPress has a large and active community of users, developers, and designers who are always willing to help with any issues you may have. There are also a number of online resources available that can help you learn more about using WordPress.
Cons of WordPress
- Limited flexibility: While WordPress offers a lot of flexibility, there are still some limitations to what you can do with it. If you’re looking for a CMS that offers complete freedom to customise your site, you may want to consider a different option.
- Not as scalable as some other CMSs: WordPress is a good choice for small- to medium-sized projects, but it may not be the best choice for large-scale projects. If you’re looking for a CMS that can easily scale as your project grows, you may want to consider a different option.
- Security vulnerabilities: WordPress is a popular target for hackers because it’s so widely used. If security is a concern, you may want to consider a different CMS.
- User Interface: While it is relatively easy to use, WordPress’ User Interface can be confusing and unintuitive for new users and those without a technical background.
Pros of Strapi

- Flexible and extensible: One of the biggest advantages of Strapi is its flexibility. It’s easy to extend with custom plugins and components, which makes it a good choice for larger projects that require more customisation.
- Built-in Authentication: Strapi has built-in authentication which makes it easy to secure your content. You can add users and roles, and set up permissions to control who can access what.
- Internationalisation: Strapi is localised in over 20 languages, which makes it a good choice for those who need to create a multilingual website or application.
- REST and GraphQL APIs: Strapi comes with built-in support for both REST and GraphQL APIs. This makes it easy to connect to third-party services and integrations.
Cons of Strapi
- Requires programming knowledge: Strapi is a headless CMS, which means it requires some programming knowledge to use. If you’re not comfortable with coding, you may want to consider a different option.
- Not as widely used as WordPress: Strapi is a newer CMS, and it’s not as widely used as WordPress. This means there’s a smaller community and fewer resources available as compared to WordPress.
- Limited plugins and themes: As Strapi is newer, there are fewer plugins and themes available. This may change over time, but for now, it’s something to keep in mind.
Which one should you use for your next project?
It all depends on your specific needs. If you’re a small business looking for an easy-to-use CMS with a wide range of features, WordPress might be a good choice for you. For larger, more complicated projects, Strapi has proven to be a more flexible and dependable CMS with an easy-to-use admin section.
However, Strapi isn’t for beginners. To get the most out of your project it pairs well with Frontend languages like React JS and Next JS. Combining them together with a fast and reliable database like MongoDB, you can really build a powerful, reliable and responsive Enterprise-level project.
Ultimately, it all comes down to what you require from your content management system, and what your project goals are.
If you’re not sure, we make it easy for you. We have a team of developers experienced in building WordPress websites and E-Commerce stores, as well as larger projects utilizing Strapi combined with React JS or Next JS on the Frontend.


The JavaScript ecosystem is as dynamic as the language itself. Every day, new ideas and ways of solving issues with JavaScript are developed, which has given rise to the tools being created.
React has, however, gained ground as the most used library or framework used among developers, which makes it the go-to first framework for new developers in the JavaScript ecosystem but come to think of it, Next.js is built with the same React library. What is the difference, and why?
In this article, we will be talking about two of the most used JavaScript frameworks, React and Next.js, as well as seeing what advantages and disadvantages one has over the other.

What Is React?
React is a UI library created by Meta to build reactive apps based on event triggers. In a traditional approach, a website reloads when data needs to be changed, which means when something is clicked, the whole page reloads to show another state which in most cases can be slow to reload. Furthermore, the concept of using React components stops the reprocessing of every code or logic for that particular page. React components can be stateless or stateful and only re-render within the scope of the applied state. React is built to be declarative. That means you get to decide the workflow. You get to control how your app works, making React a powerful tool.Features of React
The following features made React edge over other frameworks:- JavaScript Syntax Extension (JSX)
- Component
- Virtual DOM
- One-way data binding
Component
Everything in React is a component. Multiple React components are coupled together to create simple user interfaces for very large and complex UI. Each of these components can have its logic and behaviors. Components are reusable in any part of the web page by just calling it.Virtual DOM
The virtual DOM is an instance of the original or actual DOM. The browser’s DOM is in its first slow and still re-renders everything to show a small state change which makes the case even worse, but the React team came up with a concept of creating another instance of the actual DOM with JavaScript, which is actually fast and when a state change occurs, the virtual DOM makes a comparison between it and another new virtual DOM. If the two DOMs are equal, the actual DOM never gets touched; the actual DOM gets updated.One-Way Data Binding
A components logic contains the data to be displayed on the user interface. The connection flow between the data displayed and the logic component is called data binding in React.js. One-way binding means data flows from the parent components to the children only. This is a simpler way of data flow than two-way binding, which can become complex. These data are passed using a read-only prop, which cannot pass back data to the parent component but has a way of communicating to the parent for state changes based on inputs.Advantages of React.js
Easy to Learn
Currently, the educational state of React.js is good because, over the years, React has grown with its community, and the community has made thousands of materials available for reference. The good supply of documentation and tutorial videos makes React.js a good catch.JavaScript Syntax Extension
JSX is a JavaScript syntax extension that makes writing dynamic web apps in React.js easier. JSX code is compiled to JavaScript, and the Babel compiler will automatically optimize your code for performance. JavaScript syntax extension code is also type-safe, and its type checker will help you catch errors in your code. JSX is an important part of React.js, and it is recommended that you use JSX when developing React.js applications.Reusable Components
React is a powerful JavaScript library that enables developers to create Reusable User Interfaces (UI). A key feature of React is the ability to create Components, which are self-contained units of code that can be reused throughout your app. This means that you can build your UI from small, reusable pieces, making your code more readable and maintainable.Performance Enhancement
One of the reasons for its success is its performance. React uses a virtual DOM to manage updates to the user interface. This makes React apps fast and responsive. When a user interacts with a React app, only the relevant parts of the DOM are updated. This means that there is no need to redraw the entire page. This makes React apps much faster than traditional JavaScript frameworks. In addition, React can be used with other libraries and frameworks to create even more powerful applications. For these reasons, React is an excellent choice for building high-performance user interfaces.React.js Is SEO Friendly
React.js is a JavaScript library that is used for building user interfaces. It is also known for its speedy performance and small size. React.js is SEO friendly because it uses server-side rendering. This means that the content of your React.js application will be rendered on the server before it is sent to the client. This can help to improve your website’s search engine optimization because the content will be visible to search engines as soon as it is rendered. React.js applications are typically very well-structured, which can also help improve your website‘s SEO. If you are looking to build a fast, lightweight web application that is also SEO-friendly, React.js may be the perfect option for you.Easily Write Unit Tests
One of the reasons it is so popular is because it is easy to test. There are many libraries available that make it easy to set up unit tests, and there are also options for end-to-end testing. In addition, React’s component-based architecture makes it easy to isolate individual parts of the application for testing. As a result, React.js applications are typically very well-tested, which helps ensure a high-quality level.Disadvantages of React
Fast-Developing
React.js has gained a lot of popularity in recent years due to its high pace of development. However, this has also led to some disadvantages for developers. One of the biggest problems is that React.js is constantly changing, and it can be difficult to keep up with the latest improvements. This means that developers need to invest a lot of time in keeping up with the React ecosystem, which can be a deterrent for some people. Additionally, the high pace of development can also lead to some bugs and instability in React applications.Complex Documentation
As any React developer knows, the React documentation is essential for learning how to use the library. However, as the library grows in size and complexity, the documentation has become increasingly difficult to navigate. In addition, many of the examples are outdated, and there is often little explanation of how the code works. As a result, developers have to spend a lot of time searching for answers to their questions. This problem is compounded by the fact that React is constantly changing, and new features are constantly added. In order to keep up with the ever-changing landscape, developers need to spend a significant amount of time reading through the documentation. Consequently, React documentation has become a major barrier to entry for new developers.Re-Rendering
React component life-cycle makes React re-render unnecessarily. React web apps are all made up of components, and when there is a change, Reacts checks for the change and renders it, but it may meet an unexpected change due to how JavaScript handles comparisons and equality. Such unintended change can cause unnecessary re-rendering.What Is Next.js?
Next.js is a light framework built on top of React that makes it easy to create fast, server-rendered websites. It was created by the team at Vercel and has been open-source from the beginning. Next.js is used by some of the biggest names in the tech industry, including Airbnb, Twitter, and Uber. One of Next.js’s key features is its ability to automatically code-split your application, meaning that each page only loads the necessary JavaScript for that page view. This results in faster page loads and an improved user experience. Another key feature is its seamless integration with React Hooks, allowing you to use stateful components without extra configuration.Features of Next.js
The following features make Nextjs a cutting-edge tool for developers:- File system routing
- Server Side rendering
- Static site generator
- Image optimization
- Automatic code splitting
- Type script support
- API route
File System Routing
Next.js is a JavaScript framework that makes creating routes for your web app easy. When you add a file to the page’s directory, it is automatically available as a route. This makes it very easy to create complex web apps with many different pages. In addition, Next.js provides a number of features that make it easy to manage your routes. For example, you can easily specify the order in which your routes are displayed, and you can also specify how your routes are displayed on mobile devices. As a result, Next.js is an ideal choice for creating web apps with many different pages.Server-Side Rendering
Next.js supports the rendering of pages on user requests on the server-side by generating a non-interactive HTML, while React uses JSON data and JavaScript instruction to make the page interactive on the client-side.Static Site Generator
Statically generated web pages are said to be SEO optimized because of their speed, which can make Google rank that page higher. With Next.js supporting static page generation makes it stands out against React.Image Optimization
The HTML![]()
next/image component is imported. With this feature, images automatically resize to the screen size seamlessly, even images from a remote location. This new feature provides developers with an easy way to optimize their images for performance without having to manually resize or compress them.
In addition, the Next.js team has also added a built-in loading spinner that will be displayed while an image is loading, further improving the user experience. With these new features, the Next.js framework continues to be an excellent choice for building high-performance web applications.
Automatic Code Splitting
As your Next.js applications grow bigger, the size of a third-party library, CSS, and JavaScript files or bundles increases. Instead of downloading a large file on page load, these code/scripts can be split into smaller units, and for every feature required, these scripts are downloaded immediately, thereby increasing performance. What is so intriguing about this is that Next.js does this automatically.Typescript Support
Typescript is a superset of JavaScript that adds type checking and other features that can help to improve the quality of code. While Typescript is not required for Next.js, it can be a valuable tool for developers looking to improve the quality of their code.API Route
Next.js provides a built-in way to create your own APIs, called API routes. With API routes, you can create your own endpoints and handle incoming requests however you want. You can use API routes to create a custom backend for your Next.js application or to expose data from your database to the front end. Either way, API routes give you a lot of flexibility in how you build your Next.js application.Advantages of Next.js
What reasons are there to use Next.js for your next project or even considering to learn it?Speed
Next.js supports static site generation and server-side rendering. Static generation is fast because all web application pages have been pre-rendered, cached, and served over a CDN. Server-side rendering is fast as the server handling the request, but on request, these pages are already built on the server rather than being built on the client side.Less Setup
In Next.js, most features you get come with zero configuration as they are inbuilt. For example, the page routing is where you do not need to write any code to create a route in your app.Easily Create Your Own Back-End
Easily create your custom back-end functionalities to power your own front-end. This does not affect the size bundle of your client-side application.Built-In CSS Support
One of the key features of Next.js is its built-in CSS support. This means that developers can include CSS Stylesheets within their Next.js projects without needing to use any additional libraries or tooling. This can be particularly useful for small projects where adding a CSS preprocessor would add unnecessary complexity. In addition, the built-in CSS support means that developers can take advantage of features such as server-side rendering and code splitting without having to worry about whether their CSS will be properly processed.Disadvantages of Next.js
Next.js is a great framework with rapid growth but has downsides to it. Let’s take a look at it below:Development and Maintenance
Building a Next.js application requires a significant upfront investment. Not only do you need developers who are familiar with Nextjs, but you also need to dedicate ongoing resources to maintaining the application.Vendor Lock-In
Next.js forces developers to virtually do things in their own way and standards. Just a lot of developers dislike webpack and here comes Next.js forcing you to use it without configuring it.Routing System
Next.js’s routing system is helpful, but it comes at a cost. By tightly coupling your routing logic to your pages, you make your pages heavier and more difficult to maintain. This can be a serious problem if you need to change your routes frequently or want to reuse your routing logic in other parts of your application.Community
Unfortunately, Next.js doesn’t have a strong user community when compared to other frameworks. This can make finding answers to problems more difficult, as there are fewer people to ask for help. In addition, the small community can also mean that there are fewer resources available, such as tutorials and blog posts. As a result, those who are new to Next.js may find it more difficult to get started. However, the community is growing slowly but surely, and hopefully, soon, it will be able to compete with the larger frameworks.Next.js vs. React Comparison
In this section, we will be making a comparison between two of the most used tool for front-end development in the JavaScript ecosystem to help you decide which of the tool to use based on your requirements. Let’s delve right in:State of Education
If you’re already familiar with React, you’ll find Next.js easy to learn. That’s because Next.js is built on top of React, so it inherited all the benefits of React (such as being component-based and declarative) while also adding its own features and functionality. React, however, has a low difficult learning level. Over time, resources have been made in a very substantial amount; with all these, the learning curve is not too steep.Performance
Next.js is a static site generator, and static web pages tend to load the fastest because these pages are pre-rendered on build, cached, and severed over a CDN. It also supports server-side rendering, which is another fast rendering method. React uses client-side rendering, which is considered to be rather slow but React can be configured to also use other rendering methods. The only difference is the work you have to put in to get it working.Documentation
The learn-by-doing documentation on the Next.js website is a great resource. The documentation provides concise, step-by-step instructions that will help you get up and running in no time. In addition, the learn-by-doing approach ensures that you don’t just learn the theory but also get practical experience working with the tool. As a result, you’ll be able to hit the ground running and start building Next.js applications as soon as you finish the documentation. The React documentation is comprehensive and easy to follow. It includes tutorials, articles, and videos covering all React development’s basics. In addition, the React community is very active, and there are many resources available to help developers solve problems they encounter. As a result, React is an excellent choice for developers who want to create modern user interfaces.Configuration
React is also opinionated about how code should be organized, making it hard to work with other libraries with different conventions. In addition, React doesn’t provide a lot of built-in features, so you have to build everything from scratch or use third-party libraries. This can be time-consuming and adds complexity to your project. However, the tradeoff is that React is easy to learn and use and makes development more efficient. So while React may not be very configurable, it can still be a good choice for your project depending on your needs. One of the benefits of using Next.js is that almost everything is configurable through the use of templates. For example, you can createbabelrc, jest.config, and eslintrc files to customize the build process and linting rules for your project. This flexibility makes Next.js an attractive option for developers who want complete control over their project’s configuration.
Experienced Developers
We can say that React is the winner here because of its popularity. Finding React developers for your web development or software project might not be so much of a headache. While Next.js is a popular framework for building web applications, finding developers with experience working with the platform can be difficult. This is because Next.js is relatively new and has only recently gained widespread adoption.Server-Side Rendering
Next.js supports SSR; you don’t need any configuration to make this happen. On the other hand, React doesn’t support server-side rendering by default but can be done with some extra effort.Overview of Next.js vs. React
Below is a table for a brief overview:
Is Next.js Better than React?
When deciding whether to use React or Next.js for a project, it is important to consider the specific needs of the project or problem you are trying to solve. While React is a great general-purpose solution, Next.js offers some advantages for specific types of projects. For example, if you are building a static site or an application that doesn’t require complex routing, Next.js can be a good choice because it automates many of the build processes and offers built-in support for server-side rendering. On the other hand, if you are working on a large-scale project that requires dynamic routing and heavily data-driven components, React may be a better option. Ultimately, there is no clear “winner” between Next.js vs React – it all depends on the particular requirements of your project.When to Use React Over Next.js?
React is a great option when you’re working on a large-scale web application that requires complex routing and heavily data-driven components. React is a front-end JavaScript library that helps developers create user interfaces and reusable UI components. When used in combination with other technologies such as Redux, React Router, and Webpack, React can be used to build large-scale web applications. One of the benefits of using React is that it makes code maintenance easy by allowing developers to create isolated components that can be reused throughout the application. React also has a broad talent pool, which makes it easier to find experienced developers to work on your project. Furthermore, React is a great choice for building client-side rendered applications. It uses a virtual DOM to efficiently update and render components and has a number of features that make it easy to work with data. React supports both one-way and two-way data binding, which means that you can easily bind data from your application state to your UI. In addition, React comes with a number of additional libraries that can be used to add extra functionality to your application. So if you’re working on a project that requires complex routing and heavily data-driven components, or if you’re building a client-side rendered application, React may be the right choice for you.- Client-Side Rendered Applications
- Offline Support and Developer Experience
- Component Creation & Reusable Components
- Development Team
- Scalability
Best Use Cases for React
- Online streaming platforms (Youtube, Netflix).
- Social media platforms (Facebook, Instagram, TikTok).
- Delivery platforms (Uber, Lyft).
- SaaS tools (Send Grid, Zapier)
- News sites
When to Use Next.js Over React?
Next.js is a great choice if you are building a static site or an application that doesn’t require complex routing, as it automates many of the build processes and offers built-in support for server-side rendering. On the other hand, if you are working on a large-scale project that requires dynamic routing and heavily data-driven components, React may be a better option. Ultimately, it depends on the specific needs of your project:- JAMstack
- Single Stack
- Personalization
- SSR
- Static Sites
Best Use Cases for Next.js
- E-commerce stores
- Blogs
- Marketing websites
- Landing pages
The Bottom Line: Will Next.js Replace React
JAMstack is a modern web development architecture that uses JavaScript, APIs, and pre-rendered Markup. Next.js is a great tool for JAMstack because it uses server-side rendering to automatically generate HTML pages from your React components. On the other hand, React is a front-end JavaScript library that helps developers create user interfaces and reusable UI components. When used in combination with other technologies such as Redux, React Router, and Webpack, React can be used to build large-scale web applications. One of the benefits of using React is that it makes code maintenance easy by allowing developers to create isolated components that can be reused throughout the application. Furthermore, choosing what tool you need depends on the problem you want to solve and the situation. Next.js will in no way replace React, not anytime soon. It would only make sense for new developers to learn the basics of CRA (create-react-app) before delving into Next.js. We hope these comparisons help you choose what tool you need for your next project or help you take the right action in your coding journey as a new developer.Frequently Asked Questions About Next.js vs. React
Should I Use Next.js or React?
Choosing between Next.js and React depends on the specific needs of your project. If you’re building a large-scale web application that requires complex routing and heavily data-driven components, React may be a better option. If you’re looking to build a JAMstack application or a static site, Next.js may be a better fit. Ultimately, there is no clear winner between the two – it all depends on your project’s requirements.Is Next.js Better Than React?
Choosing between Next.js and React depends on the specific needs of your project. If you’re building a large-scale web application that requires complex routing and heavily data-driven components, React may be a better option. If you’re looking to build a JAMstack application or a static site, Next.js may be a better fit. Ultimately, there is no clear winner between the two – it all depends on your project’s requirements.Is Next.js and React the Same?
No, Next.js is not the same as React. Next.js is a framework built on top of React that provides additional features such as server-side rendering and automatic code splitting. React is a JavaScript library used for building user interfaces, while Next.js adds features and functionality to React to make it easier to build certain types of web applications.Best JavaScript Frameworks for Your Next Project
Download the best JavaScript frameworks guide to answer the ‘which JavaScript framework to use for your next project?’
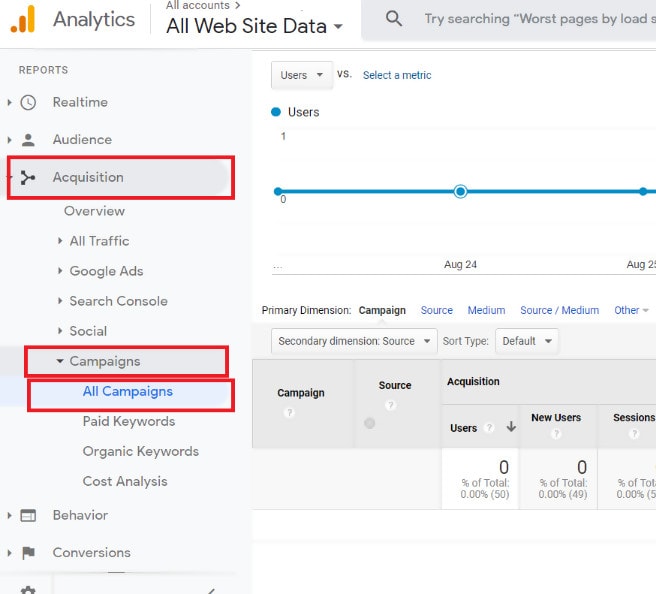
Table of Contents:
When running a business, finding out as much as you can about your website traffic is crucial. If you can discover which ad campaigns are pulling in the most visitors, then you can decide where you should focus your time and effort to reap the biggest reward.
UTM (Urchin Tracking Module) parameters are incredibly handy tools to help you do just that by tracking how your traffic is getting to your site. Read on to learn how to master UTM parameters through Google Analytics.
What is UTM?
UTM parameters are vital for keeping track of your website’s traffic. These codes can help you get a closer look into where exactly your visitors are coming from, so you know where your ads are working.
The 5 UTM Parameters
UTM parameters track traffic through two components: the UTM parameter and the tracking variable. The UTM parameter starts with utm_ and allows you to track 5 different parameters: campaign, medium, source, term, and content. The tracking variable is a unique variable text that identifies the parameter being tracked. It is important, however, to first understand UTM Naming Conventions when using these 5 parameters.
For example, in this UTM code: utm_source=facebook – “utm_source” is the UTM parameter while “facebook” is the tracking variable.
1. The Campaign Parameter (utm_campaign)
This parameter provides the name of the specific marketing campaign, such as “launch” or “giant sale.”
The campaign parameter is useful for tracking the effectiveness of a particular marketing campaign in which you may have multiple ads across multiple channels but utilizing one strategic approach such as a sale or a relaunch.
- Example: utm_campaign=giant%20sale
- In this example, “%20” replaces the space, which cannot be used in a URL. “giant sale” is the campaign name being tracked by this parameter.
- Additional example: utm_campaign=launch.
When used in your URLs, this parameter provides you with more insight into your marketing performance. UTM parameters help organize and track visitors to your website, especially when their browser does not set a Referrer URL for any particular reason.

To find your campaign UTM parameter in Google Analytics, navigate to the Acquisition tab on the left panel, then click Campaigns, then click All Campaigns – and you will see a list of your campaign names (utm_campaign)
Pro Tip: Campaign Tracking is necessary to find out whether or not your ads are effective so it’s essential to understand the process of creating and tracking your campaigns.
2. The Medium Parameter (utm_medium)
This parameter defines which medium the visitor used to find your website, such as “social”, “email” or “cpc.” This parameter is useful to distinguish which medium is bringing you the most traffic or the highest quality traffic, as you can separate the traffic in Analytics.
- Example: utm_medium=social
- In this example, “social” shows that the traffic came from an ad viewed organically on one of your social networks – such as a funny or engaging post you created.
- Additional example: utm_medium=email
In this example, the parameter shows that your traffic came from an email message that you sent.
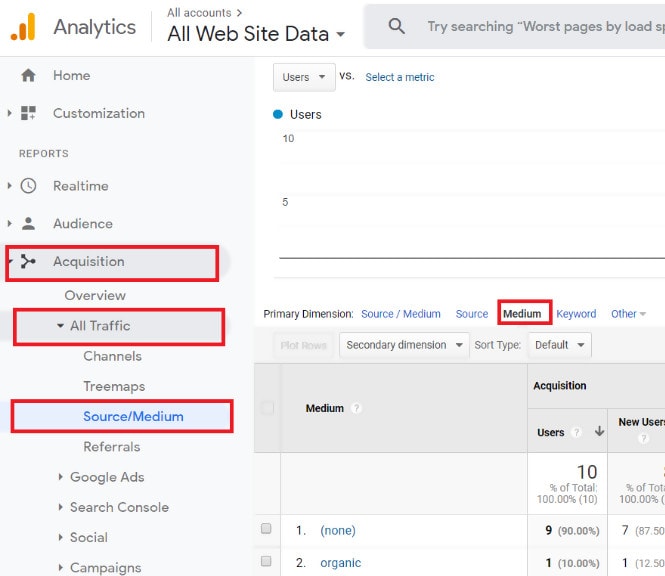
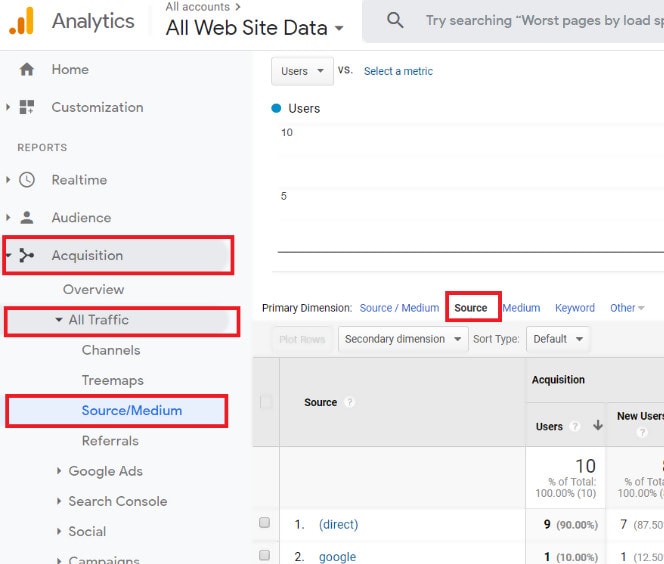
To find your medium UTM parameters in Analytics, navigate to the Acquisition tab on the left panel, then click All Traffic then Source/Medium.
Initially, you will see a combined view of the UTM source and medium dimensions in Analytics. You can click on the “Medium” blue text link underneath the graph to see the traffic related to the utm_medium parameter.
3. The Source Parameter (utm_source)
This parameter tells you what the source of your traffic is, such as “google” “Instagram” or “twitter.” The source parameter provides specificity regarding which websites are referring your traffic.
The utm_source parameter differs from the utm_medium parameter because it provides specific information on your referring websites, while utm_medium is used to track the effectiveness of a marketing medium.
It’s helpful to know if you are getting more customers from your Instagram efforts – you can then scale your efforts up to achieve more business results.
- Example: utm_source=instagram
- In this example, traffic is coming from Instagram.
- Additional example: utm_source=google
To find your UTM_source parameters in Analytics, follow the same initial steps as you did for UTM_medium. Navigate to the Acquisition tab on the left panel then click All Traffic then Source/Medium.
Initially, you will see a combined view of the UTM source and medium dimensions in Analytics.
Then click on the “Source” blue text link underneath the graph to see the traffic related to the utm_source parameter.
4. The Term Parameter(utm_term)
Primarily used in Google AdWords campaigns, this parameter informs you which terms were used in search ads, such as “shorts sale” or “deal on shirts.”
It allows the marketer to understand which terms have led their customers to their website. If you find there are specific terms that are sending more customers to your website, you can increase your efforts to try to rank your website higher for those terms organically or through paid search.
- Example: utm_term=shorts%20sale
- In this example, visitors are finding the website through the term “shorts sale.” “%20” again replaces the space.
- Additional example: utm_term=deal%20on%20shirts
See below on how to find utm_term in Analytics.
5. The Content Parameter(utm_content)
This parameter lets you know what call-to-action brought in traffic, such as “buy today” or “more information.”
You may want to know if a particular call to action is working better than another. For example, maybe “buy today” in your text link or button is resulting in a higher clickthrough rate than “more information.” This parameter would help you determine which one is performing better for you.
- Example: utm_content=buy%20today
- In this example, visitors are seeing the CTA term “buy today” and clicking on it.
- Additional example: utm_content=more%20information
When you use the appropriate parameters in your URLs, you can easily compare the traffic each call to action is sending in Analytics.
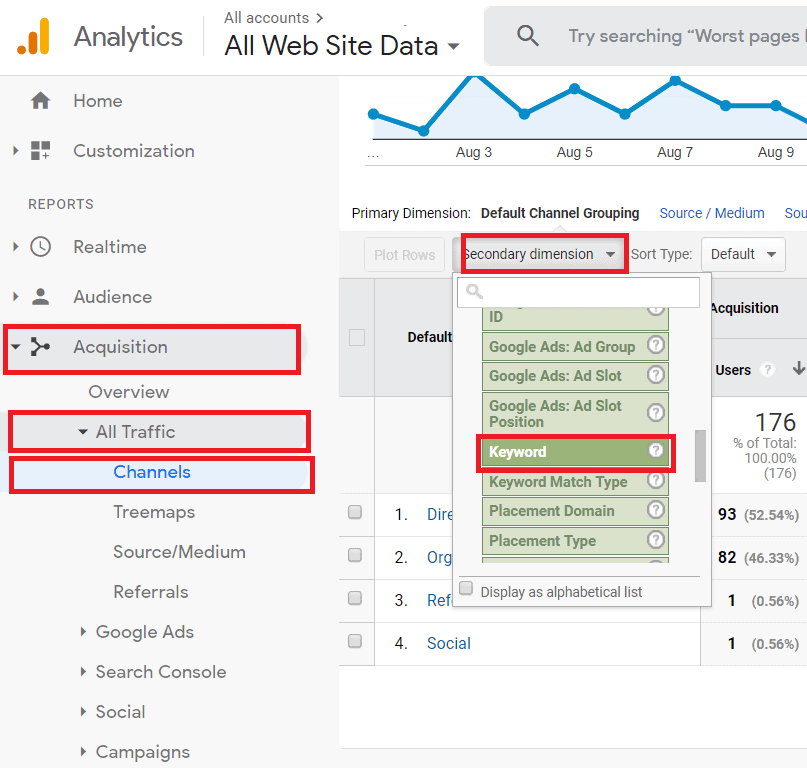
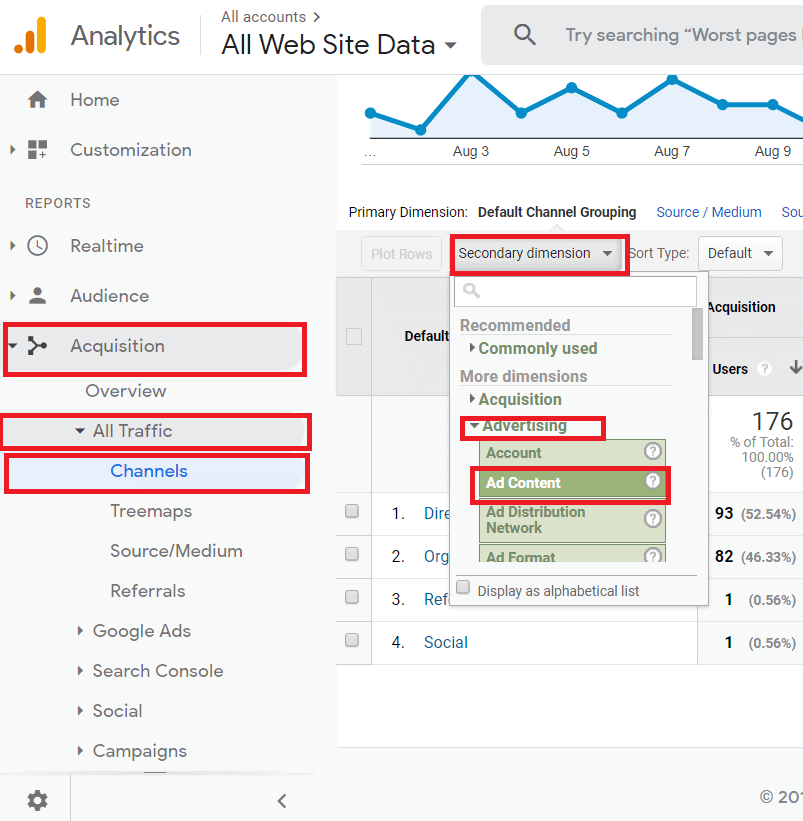
How Do You Find utm_term and utm_content in Analytics?
Navigate to the Acquisition tab on the left panel then click All Traffic then click Channels. Then click the Secondary Dimension button below the graph and select the Advertising drop-down menu then select Ad Content (for utm_content) or Keyword (for utm_term).
UTM parameters are useful for tracking in many situations such as to track links in your email campaigns, social media campaigns, paid campaigns (except for Google Adwords which already provides tracking in Google Analytics), affiliate campaigns (people promoting your product or service for a commission), or offline campaigns (recommended to shorten URLs for offline campaigns).
There are a few situations where you should not use UTM parameters, such as for internal links or organic (unpaid) search links. Using them on internal links can create confusion when visitors arrive from one source and then click an internal link with a UTM parameter that indicates a different source. They are also not that useful for natural referrers, such as people writing about your website and linking to it, because the Referrer URL already provides helpful information about the source of this website traffic. These cases are important to remember and so we’ve compiled a guide for your convenience.
These five UTM parameters can be instrumental in analyzing your traffic and improving your visitor numbers. Marketers can benefit from this information and can make more educated efforts into advertising thanks to UTM codes. Campaigns, mediums, sources, terms, and content are all factors in your traffic, and being able to track each item individually can make a work of difference in watching your analytics. Take control of your website by employing UTM parameters and take your business further than you could have ever imagined.
Get started with Terminus
The quickest and easiest way to create UTM links in bulk while following your complex UTM strategy.

In the digital landscape, the terms “website” and “web app” are often used interchangeably, but they represent distinct concepts with unique characteristics and use cases. Understanding the differences between websites and web apps is crucial for making informed decisions about your online presence. In this article, we’ll explore the distinctions between websites and web apps, and discuss when each option is the best fit for your needs.
Websites:
A website is a collection of interconnected web pages that are typically designed to provide information, content, and resources to visitors. Websites are primarily static, meaning their content remains relatively constant and doesn’t change frequently. Here are some key features of websites:
1. Content-Centric: Websites are designed to display content to users, such as text, images, videos, and links. They’re commonly used for blogs, news portals, informational pages, and company profiles.
2. Navigation-Oriented: Websites emphasize navigation to allow users to easily move between pages and access the desired information. Navigation menus, headers, and footers are common components.
3. Limited Interactivity: While websites can include basic interactive elements like forms and buttons, their focus is on presenting content rather than complex user interactions.
4. Minimal Data Processing: Websites don’t involve extensive data processing or calculations on the client side. Server-side scripting is used to generate and serve pages to users.
5. Examples: Blogs, news websites, company websites, portfolio sites.
Web Apps:
A web app, short for web application, is a dynamic and interactive software application accessible through a web browser. Web apps provide a richer user experience and functionality beyond what traditional websites offer. Here are the distinguishing features of web apps:
1. Functionality-Centric: Web apps are built to perform specific functions or tasks, often replicating the functionality of traditional desktop or mobile applications.
2. Complex Interactivity: Web apps offer advanced user interactions, including real-time updates, data manipulation, and personalized experiences. They can feature interactive dashboards, collaborative tools, and multimedia content.
3. Data-Driven: Web apps rely on databases and server-side processing to manage and process user data. This allows for dynamic content generation and customization.
4. Responsive Design: Web apps are designed to be responsive across various devices and screen sizes, ensuring a consistent user experience on desktops, tablets, and smartphones.
5. Examples: Online banking systems, project management tools, e-commerce platforms, social media networks.
Choosing Between a Website and a Web App:
The decision to create a website or a web app depends on your specific goals, requirements, and the experience you want to offer to your users.
Choose a Website When:
- You need to present information or content to your audience.
- Your primary goal is to provide static information, like company details or news articles.
- You don’t require advanced interactivity or complex functionality.
- Your focus is on search engine optimization (SEO) and content discoverability.
Choose a Web App When:
- You want to deliver interactive and dynamic user experiences.
- Your project requires complex functionality, real-time updates, and data processing.
- Users need to perform specific tasks or use your application to achieve goals.
- You want to offer a personalized experience based on user interactions and preferences.
In some cases, a hybrid approach is also possible, where you start with a website to establish an online presence and later introduce web app features to enhance user engagement.
Conclusion:
Websites and web apps serve different purposes and cater to distinct user needs. Websites are ideal for sharing information and static content, while web apps provide advanced functionality, interactivity, and data-driven experiences. Understanding the differences between these two concepts will guide you in making the right choice for your digital project, ensuring that you deliver a seamless and engaging online experience to your users.